部品のページ
アイコン見出し
HTML
<h2 class="mxn_headline01">見出しサンプル</h2>CSS
.mxn_headline01{
	position: relative;
	padding-left: 1.5em;
}
.mxn_headline01:before {
	position: absolute;
	left: 0;
	top: 0;
	font-family: "Font Awesome 5 Free";
	content: "\f06a";
	font-weight: 900;
	font-size: 1em;
	color: #1f87d5;
}
アイコンはFontAwesomeの無料のものを使用。
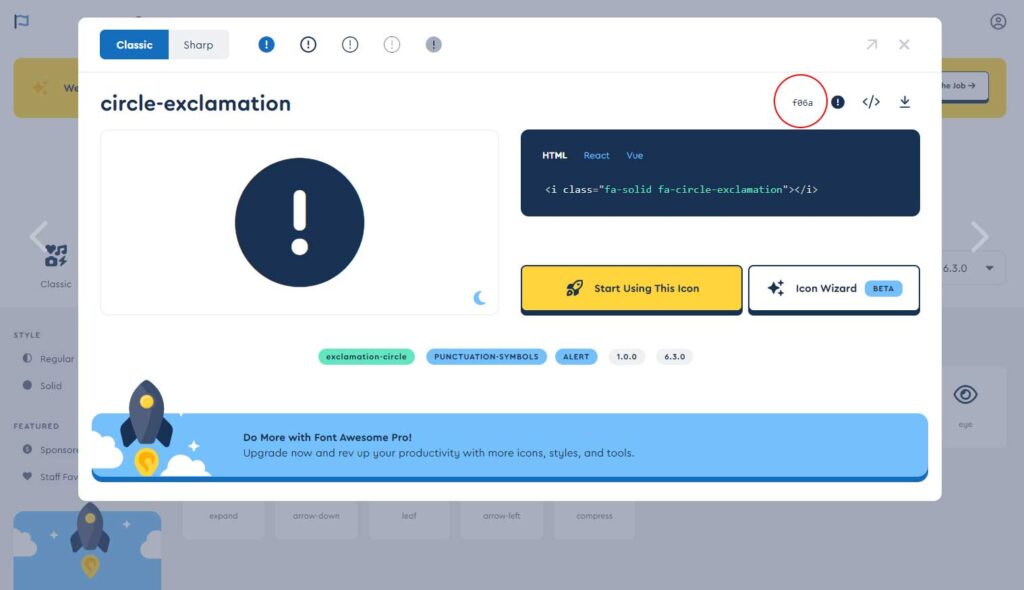
使いたいアイコンをクリックすると下の画像のようにポップアップが出る。
画像の赤丸部分をコピーし、「\」を付ける。
例)content: “\f06a”;
使いたいアイコンをクリックすると下の画像のようにポップアップが出る。
画像の赤丸部分をコピーし、「\」を付ける。
例)content: “\f06a”;
wordpress のダッシュボード→Divi→統合タブ→「コードをブログの < head > に追加する。」
に以下を追加する。
<script src="https://kit.fontawesome.com/8fe42ef8a8.js" crossorigin="anonymous"></script>
[ba_advanced_divider active_element=”text” border_type=”pattern” border_color=”#D6D6D6″ _builder_version=”4.20.2″ _module_preset=”default” global_colors_info=”{}”][/ba_advanced_divider]
アイコン見出し2
HTML
<h2 class="mxn_org_midasi05">アイコン見出し2</h2>
CSS
.mxn_org_midasi05{
position: relative;
padding:0.5em 0.5em 0.5em 1.7em;
line-height: 1.4;
border-top: dotted 1px gray;
border-bottom: dotted 1px gray;
}

.mxn_org_midasi05:before {
font-family: "ETmodules";
content: "\70";
font-weight: 900;
position: absolute;
font-size: 1em;
left: 0.25em;
top: 0.5em;
color: #1e2838;
}
font-familyにETmodulesを使ったパターン
こちらのページから好みのアイコンを探し、「&#x」と「;」を消して「\」を付けて、contentに記述する。
例)p → content: “\70”;
[ba_advanced_divider active_element=”text” border_type=”pattern” border_color=”#D6D6D6″ _builder_version=”4.20.2″ _module_preset=”default” global_colors_info=”{}”][/ba_advanced_divider]
両サイドに逆ハの字見出し
HTML
<h2 class="mxn_org_midasi01">見出しタイトル</h2>CSS
.mxn_org_midasi01 {
display: flex;
justify-content: center;
align-items: center;
font-size: 26px;
text-align: center;
}

.mxn_org_midasi01::before,
.mxn_org_midasi01::after {
content: '';
width: 3px;
height: 40px;
background-color: #1e2838;
}

.mxn_org_midasi01::before {
margin-right: 30px;
transform: rotate(-35deg)
}
.mxn_org_midasi01::after {
margin-left: 30px;
transform: rotate(35deg)
}
[ba_advanced_divider active_element=”text” border_type=”pattern” border_color=”#D6D6D6″ _builder_version=”4.20.2″ _module_preset=”default” global_colors_info=”{}”][/ba_advanced_divider]
横に縦線見出し
テキストの「デザイン」タブで「境界」の左を追加するだけ。
[ba_advanced_divider active_element=”text” border_type=”pattern” border_color=”#D6D6D6″ _builder_version=”4.20.2″ _module_preset=”default” global_colors_info=”{}”][/ba_advanced_divider]
下だけ吹き出し風見出し
HTML
<h2 class="mxn_headline02">下だけ吹き出し風見出し</h2>CSS
.mxn_headline02 {
  position: relative;
  padding: 0.5em 1em 0.3em 1em;
  border-bottom: 3px solid #666;
}

.mxn_headline02:before {
  position: absolute;
  bottom: -14px;
  left: 1.5em;
  width: 0;
  height: 0;
  content: '';
  border-width: 14px 12px 0 12px;
  border-style: solid;
  border-color: #666 transparent transparent transparent;
}

.mxn_headline02:after {
  position: absolute;
  bottom: -10px;
  left: 1.5em;
  width: 0;
  height: 0;
  content: '';
  border-width: 14px 12px 0 12px;
  border-style: solid;
  border-color: #fff transparent transparent transparent;
}
[ba_advanced_divider active_element=”text” border_type=”pattern” border_color=”#D6D6D6″ _builder_version=”4.20.2″ _module_preset=”default” global_colors_info=”{}”][/ba_advanced_divider]
下に下線の見出し
下にディバイダーを配置、見出しのmargin-bottomを0に、ディバイダーは上部に配置。
[ba_advanced_divider active_element=”text” border_type=”pattern” border_color=”#D6D6D6″ _builder_version=”4.20.2″ _module_preset=”default” global_colors_info=”{}”][/ba_advanced_divider]
下線がストライプの見出し
HTML
<h2 class="mxn_headline03">下線がストライプの見出し</h2>CSS
.mxn_headline03{
display:inline-block;
background-image: repeating-linear-gradient(45deg, transparent 0 3px, #e06850 3px 6px);
background-repeat: no-repeat;
background-size: 100% 0.3em;
background-position: bottom;
}
下線の幅を100%にするには、cssのdisplay:inline-blockを消す。
[ba_advanced_divider active_element=”text” border_type=”pattern” border_color=”#D6D6D6″ _builder_version=”4.20.2″ _module_preset=”default” global_colors_info=”{}”][/ba_advanced_divider]
下線がストライプの見出しで中央寄せ
HTML
<h2 class="mxn_headline04">下線がストライプの見出しで中央寄せ</h2>CSS
.mxn_headline04{
background-image: repeating-linear-gradient(45deg, #f37259 0 3px, transparent 3px 6px);
background-repeat: no-repeat;
background-size: 150px 8px;
background-position: center bottom;
padding-bottom:1em;
}
[ba_advanced_divider active_element=”text” border_type=”pattern” border_color=”#D6D6D6″ _builder_version=”4.20.2″ _module_preset=”default” global_colors_info=”{}”][/ba_advanced_divider]
下線がツートンカラーの見出し
HTML
<h2 class="mxn_org_midasi03">下線がツートンカラーの見出し</h2>CSS
.mxn_org_midasi03{
position: relative;
border-bottom: 5px solid #dedede;
padding: 10px 0;
}
.mxn_org_midasi03:before {
position: absolute;
left: 0;
bottom: -5px;
width: 20%;
height: 5px;
content: '';
background: #46aadc;
}
[ba_advanced_divider active_element=”text” border_type=”pattern” border_color=”#D6D6D6″ _builder_version=”4.20.2″ _module_preset=”default” global_colors_info=”{}”][/ba_advanced_divider]
吹き出し風の見出し
HTML
<h2 class="mxn_headline05">吹き出し風の見出し</h2>CSS
.mxn_headline05{
position: relative;
padding:0.8em 0.5em;
margin-bottom:20px;
color: #fff;
background: #1e2838;
text-align:center;
}

.mxn_headline05:before {
content: "";
position: absolute;
top: 100%;
left: 50%;
margin-left: -15px;
border: 15px solid transparent;
border-top: 15px solid #1e2838;
}
[ba_advanced_divider active_element=”text” border_type=”pattern” border_color=”#D6D6D6″ _builder_version=”4.20.2″ _module_preset=”default” global_colors_info=”{}”][/ba_advanced_divider]
丸囲み見出し
HTML
<h2 class="mxn_headline07">丸囲み見出し</h2>CSS
.mxn_headline07{
position: relative;
padding: 0.5em 1em;
border-radius: 5px;
background: #d1ecf1;
display:inline-block;
}
.mxn_headline07:after {
position: absolute;
bottom: -9px;
left: 1em;
width: 0;
height: 0;
content: '';
border-width: 10px 10px 0 10px;
border-style: solid;
border-color: #d1ecf1 transparent transparent transparent;
}
[ba_advanced_divider active_element=”text” border_type=”pattern” border_color=”#D6D6D6″ _builder_version=”4.20.2″ _module_preset=”default” global_colors_info=”{}”][/ba_advanced_divider]
丸囲み見出し
HTML
<h2 class="mxn_org_midasi08">丸囲み見出し</h2>CSS
.mxn_org_midasi08{
  position: relative;
  display: inline-block;
  padding: 0.5em 1.5em;
  border-radius: 100vh;
  background: #d3f1fb;
}
[ba_advanced_divider active_element=”text” border_type=”pattern” border_color=”#D6D6D6″ _builder_version=”4.20.2″ _module_preset=”default” global_colors_info=”{}”][/ba_advanced_divider]
両側に線が入った見出しSupreme版
線の太さや色など、Diviの編集画面で調節できるので楽。
ただし、この例のように見出しが長くなるとモバイル版では両側の線が出ない。
[ba_advanced_divider active_element=”text” border_type=”pattern” border_color=”#D6D6D6″ _builder_version=”4.20.2″ _module_preset=”default” global_colors_info=”{}”][/ba_advanced_divider]
[ba_advanced_divider active_element=”text” title=”両側に線が入った見出しTorque版” border_type=”pattern” border_style_pattern=”zigzag” border_color=”#E9535E” border_weight=”2px” text_padding=”||||false|false” _builder_version=”4.20.2″ _module_preset=”default” title_level=”h2″ title_font=”||||||||” title_font_size=”24px” title_line_height=”1.5em” custom_padding=”||||false|false” global_colors_info=”{}”][/ba_advanced_divider]
[ba_advanced_divider active_element=”text” title=”下にアイコンと線のパターン” use_shape=”on” shape_weight=”2″ shape_color=”#E9535E” _builder_version=”4.20.2″ _module_preset=”default” title_level=”h2″ title_font_size=”24px” title_line_height=”1.5em” custom_margin=”||||false|false” custom_padding=”||||false|false” global_colors_info=”{}”][/ba_advanced_divider]
[ba_advanced_divider icon=”||divi||400″ border_style_classic=”solid” border_color=”#E9535E” border_weight=”1px” icon_color=”#E9535E” _builder_version=”4.20.2″ _module_preset=”default” title_level=”h2″ title_font_size=”24px” title_line_height=”1.5em” max_width=”80%” module_alignment=”center” global_colors_info=”{}”][/ba_advanced_divider]
Torqueバージョン。同じくDiviの編集画面で調節できるので楽。こちらは両側の線をカーブなどにも出来る。
やはり見出しが長いとモバイル版では線が出ない。また、モバイル版で2行になるとき、センター寄せが出来ない。
下にこんなアクセントをつけることも可能。だが、あまり使いやすものはない
こんな感じで組み合わせるのが良い
見出しのテキストは普通の「テキスト」モジュール
下にTorqueDividerのアイコンを入れている。
[ba_advanced_divider active_element=”text” border_type=”pattern” border_color=”#D6D6D6″ _builder_version=”4.20.2″ _module_preset=”default” global_colors_info=”{}”][/ba_advanced_divider]
両端に線を入れた見出しcss版両端に線を入れた見出しcss版両端に線を入れた見出しcss版
両端に線を入れた見出しcss版
HTML
<h2 class="mxn_headline06">両端に線を入れた見出しcss版</h2>CSS
.mxn_headline06{
display:flex;
align-items: center;
justify-content: center;
}
.mxn_headline06:before, .mxn_headline06:after {
content: "";
flex-grow:1;
border-top: 2px solid #1e2838;
min-width:2em;
}
.mxn_headline06:before {
margin-right: 1em;
}
.mxn_headline06:after {
margin-left: 1em;
}
これならスマホでも両端の線が消えない。ただ、文字数が少ない時はモジュールでやる方が楽。
[ba_advanced_divider active_element=”text” border_type=”pattern” border_color=”#D6D6D6″ _builder_version=”4.20.2″ _module_preset=”default” global_colors_info=”{}”][/ba_advanced_divider]
文字修飾のcss
見出しではないけど、spanをつかってストライプの下線を入れる
HTML
見出しではないけど、<span class="mxn_stripedeco">spanをつかってストライプ</span>の下線を入れる
CSS
.mxn_stripedeco{
background-image: repeating-linear-gradient(45deg, transparent 0 3px, #ffd800 3px 6px);
background-repeat: no-repeat;
background-size: 100% 0.6em;
background-position:0 100%;
text-shadow: 1px 2px 0 #fff;
}
見出しではないけど、spanをつかってストライプの下線を入れる
見出しではないけど、spanをつかってストライプの下線を入れる
HTML
見出しではないけど、<span class="mxn_stripedeco mxn_org_text_3L mxn_org_text_strong">spanをつかってストライプ</span>の下線を入れる
CSS
.mxn_stripedeco{
background-image: repeating-linear-gradient(45deg, transparent 0 3px, #ffd800 3px 6px);
background-repeat: no-repeat;
background-size: 100% 0.6em;
background-position:0 100%;
text-shadow: 1px 2px 0 #fff;
}
※その他、太字やfont-sizeを130%にするなどのstyleを追加したものです。
強調したいテキストにカーブした下線を引くcss
HTML
<span class="mxn_wavydeco">強調</span>したいテキストに<span class="mxn_wavydeco">カーブした下線</span>を引くcssCSS
.mxn_wavydeco {
text-decoration: 2px underline wavy #E056DB;
text-underline-offset:3px;
}
[ba_advanced_divider active_element=”text” border_type=”pattern” border_color=”#D6D6D6″ _builder_version=”4.20.2″ _module_preset=”default” global_colors_info=”{}”][/ba_advanced_divider]
アイコンリスト(Supreme)
- このアイコンはdiviのアイコンです。fontawesomeではありません。
- テキストテキスト
- Iテキストテキストテキストテキストテキストテキストテキストテキストテキストテキストテキストテキストテキストテキストテキストテキストテキストテキストテキストテキストテキストテキストテキストテキストテキストテキストテキストテキストテキストテキストテキストテキストテキストテキストテキストテキストテキストテキストテキストテキストテキストテキスト